NDR for Cloud Only Distribution List from Exchange (Hybrid) On-Premises.

On-Premises Mailbox isn’t able to send an email for Cloud only DL in office 365.

In order to fix that issue, we have followed the below steps.

  1. Made Internal Relay on Exchange Accepted domain.
  2. To create a group only on Office 365 and allow internal users on hybrid server to send mail.
  3. Group created on O365 and given address GROUPNAME@DOMAIN.COM.
  4. On O365 add additional email address to group in the format GROUPNAME@DOMAIN.onmicrosoft.com
  5. Takes about 10-15 minutes before internal users can send mail to O365 group.


How to recreate Outlook profiles after the Tenant migration

How to recreate Outlook profiles after the migration

Problem:

After performing a migration that includes transferring the domain name to the target server, Outlook cannot connect to the new server. The following error message is shown:

Outlook cannot log on. Verify you are connected to the network and are using the proper server and mailbox name. The Microsoft Exchange information service in your profile is missing required information. Modify your profile to ensure that you are using the correct Microsoft Exchange information service.

Solution:

This happens because the pre-migration settings of the Autodiscover service, which connects Outlook with Exchange, are still cached in the registry for the currently used Outlook profile. To resolve this, you need to create a new Outlook profile and set it as the default one. This can be done manually for each separate user or automatically for all users in your domain, by using Group Policy. Follow the links below to learn how to:

How to create a new Outlook profile for a single user

  1. Close Outlook.
  2. Go to the Windows Control Panel and click Mail (or, if you’re using the Category view, first click User Accounts, and then click Mail).
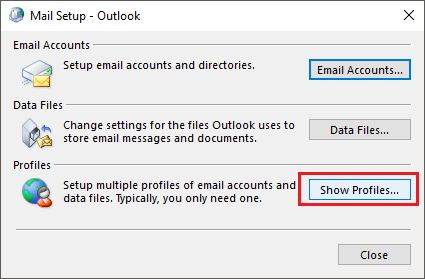
  3. In the window that opens, click Show Profiles (Fig. 1.).726-1
    Fig. 1. Accessing Outlook profiles.
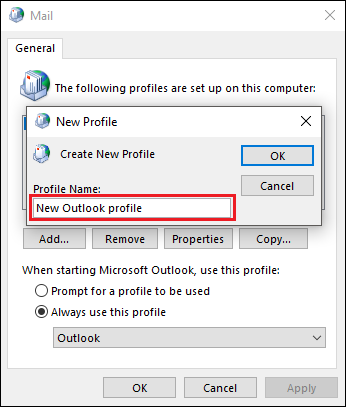
  4. Click Add, and provide the name for the new Outlook profile (Fig. 2.). Click OKto proceed.726-2
    Fig. 2. Providing a name for the new Outlook profile.
  5. Complete the wizard to add your email account and click Finish.
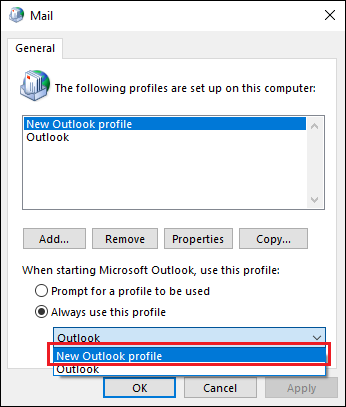
  6. Make sure the Always use this profile option is selected and choose your newly created profile from the drop-down menu (Fig. 3.).726-3
    Fig. 3. Selecting the default Outlook profile.
  7. Click OK to save changes.

Outlook should now open without any errors and connect to the correct Exchange server.

How to create a new Outlook profile for all users in the domain

A new Outlook profile can be created and set as a default one by using a simple script that adds new values to Windows registry. To bulk create new Outlook profiles for all your users, you can run this script on multiple computers via Group Policy.

Important

In this scenario, the script will be executed as a user logon script. However, a Group Policy object (GPO) can also be configured to run user logoff or computer startup and shutdown scripts.

Follow the links below to:

Creating a file containing a script to create a new Outlook profile

  1. Open Notepad (or any text editor) and paste the following text (depending on which Outlook version you use):
    • Outlook 2010
      reg add "HKCU\Software\Microsoft\Windows NT\CurrentVersion\Windows Messaging Subsystem\Profiles\<name>"
      reg add "HKCU\Software\Microsoft\Windows NT\CurrentVersion\Windows Messaging Subsystem\Profiles" /v DefaultProfile /t REG_SZ /d "<name>" /F
      reg add "HKCU\Software\Microsoft\Exchange\Client\Options" /v PickLogonProfile /t REG_DWORD /d "0" /f
    • Outlook 2013
      reg add HKCU\Software\Microsoft\Office\15.0\Outlook\Profiles\<name>
      reg add "HKCU\Software\Microsoft\Office\15.0\Outlook" /v DefaultProfile /t REG_SZ /d "<name>" /F
    • Outlook 2016
      reg add HKCU\Software\Microsoft\Office\16.0\Outlook\Profiles\<name>
      reg add "HKCU\Software\Microsoft\Office\16.0\Outlook" /v DefaultProfile /t REG_SZ /d "<name>" /F

      Where instead of <name> provide the name for the new Outlook profile.

  2. Save the file as a BAT file.
  3. Copy the file to a network location accessible for all users in the domain (e.g. %logonserver%\netlogon).

    Warning

    Make sure that each user has appropriate permissions to access this location.

Creating a GPO executing the script when a user logs in to a workstation

  1. Log in to your Windows Server domain controller (DC).
  2. Open Server Manager and select Tools > Group Policy Management.

    Tip

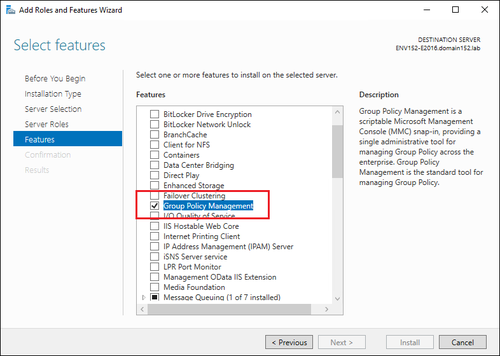
    If it’s not there, you need to install this feature first. In Server Manager, select Manage > Add Roles and Features and follow the wizard instructions. Just remember to select the Group Policy Management feature in the Features step (Fig. 4.).
    726-4
    Fig. 4. Installing the Group Policy Management console.

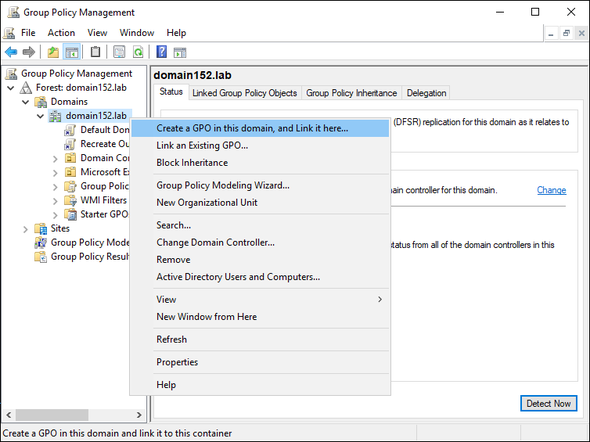
  3. In the Group Policy Management console, find your domain on the left side navigation menu, right-click it and select Create a GPO in this domain, and Link it here (Fig. 5.).726-5
    Fig. 5. Creating a new GPO.
  4. Provide the name of the new GPO and click OK.
  5. Navigate to the Group Policy Objects container on the menu, find your newly created GPO, right-click it and select Edit. The Group Policy Management Editor will open.
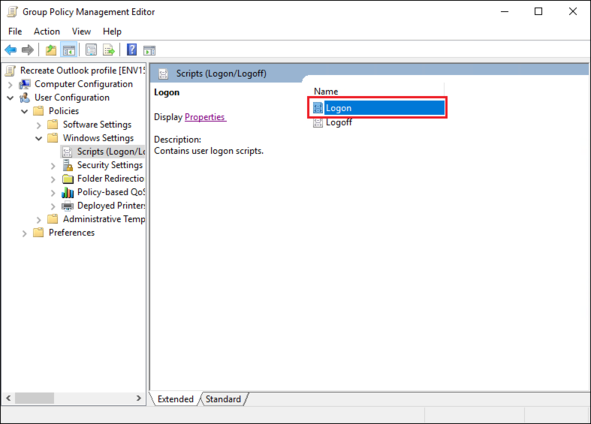
  6. Go to User Configuration > Policies > Windows Settings > Scripts (Logon/Logoff) and double-click Logon (Fig. 6.).726-6
    Fig. 6. Adding a new logon script.
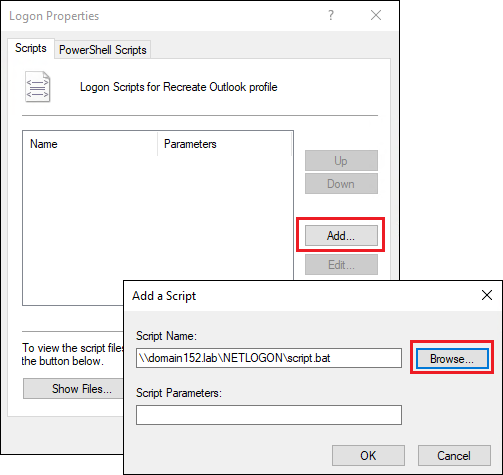
  7. In the Logon Properties window, click Add, and then click Browse and select the BAT file created in the section above (Fig. 7.).726-7
    Fig. 7. Selecting the appropriate script file.
  8. Click OK two times to save the change.

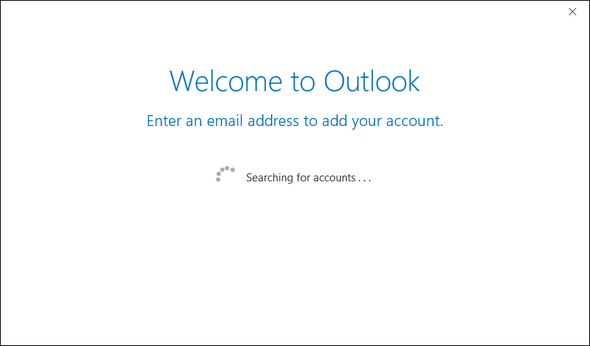
You can now close the Group Policy Management console. The script will be executed for each user when they log in to their workstations. When they try to open Outlook, the Outlook startup wizard will be shown (Fig. 8.).
726-8
Fig. 8. The Outlook startup wizard.

The Autodiscover feature should no longer have a problem connecting to the appropriate on-prem Exchange server or Office 365.

2010/2013/2016 Coexistence – 421 4.4.2 Connection dropped due to SocketError EMAILS Stuck in QUEUE

One of our engineers was facing the issue while setting up coexistence between 2010 to 2016.

all the E2010 mail flow working fine internally and externally

We moved test mailboxes to E2016 & send emails from E2010 to E2016.

E2016 mailboxes were not able to receive the email, we checked the email trace, email queue and found “421 4.4.2 Connection dropped due to SocketError” when an E2010 mailbox tries to send to an E2016 mailbox

To fix this issue we made the below changes


  • Open Regedit (Start | Run | Regedit)
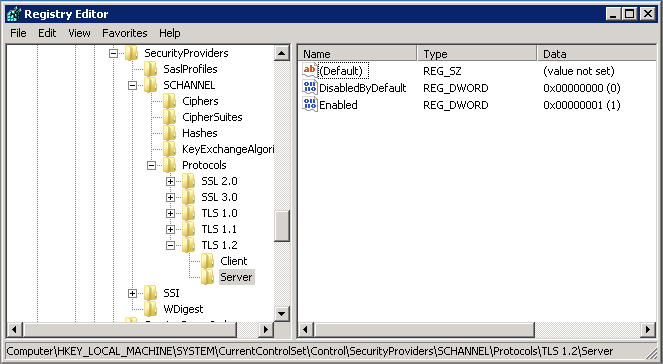
  • Navigate to the registry key: HKEY_LOCAL_MACHINE\SYSTEM\CurrentControlSet\Control\SecurityProviders\SCHANNEL\Protocols
  • Here you will need to create a key for each of the cryptographic protocols. Create keys named TLS 1.0 and TLS 1.1
  • Within each protocol key, create two subkeys. One named Client, the other named Server
  • Within each of the Client and Server keys, create a DWORD with the name Enabled. A value of 1 enables the protocol where a value of 0 disables it.
  • Within each of the Client and Server keys, create another DWORD with the name DisabledByDefault. A value of 0 enables the protocol (i.e. not disabled by default).

5

No reboot required.


Application Proxy Incorrect Kerberos constrained delegation

I was publishing the Sharepoint site 2010  with Azure application proxy Server.

I requested to Sharepoint team to make the required changes on Sharepoint Side. We have done configuration &  Site is able to accessible from outside, But we when we enabled  Single sign on with WIA by setting up SPN we were getting an error.

“Incorrect Kerberos constrained delegation configuration in your on-premises Active Directory.”

Above problem comes when you have misconfigured the SPN.

Solution:

Check the SPN Confiuration with Below cmds.

SetSPN -Q HTTP/portal.domain.com

SetSpn -L  “domain\Service account”

Please check the Event on APP proxy server.

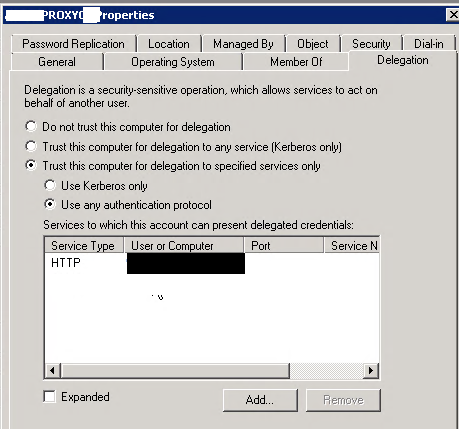
We found some event related to delegation, We checked app proxy server’s computer object in AD & hit to Delegation Tab, We found there was no SPN added.

In AD Users and Computers you will need to navigate to the OU that contains the server to which you installed the Application Proxy Connector.  Once you locate that computer entry, just right-click on it and select Properties.  In the Properties dialog click on the Delegation tab.

You need to add SPN like below Image.

1

This is how I resolved my issue, Please share your thoughts, How you resolved it.


Active Direcorty Best Pratcises

We are working on AD best practice points, We have listed few points, If you have any consideration, please comment below we’ ll update in our write-up.

Physical Security

  1. The physical server should have the redundant power supply.
  2. The physical location should be restricted.
  3. Server OS should be up to date with latest security patches.
  4. RDP Session should be limited to Admin user.
  5. Deploy full disk encryption.

Document Your Active Directory

In order to keep a clean and secure AD, it’s essential that everyone on the team is on the same page. This means documenting things like naming conventions and key security policies. Here’s a good checklist to start with:

  • Identify all of your computers, users, domain, and OU naming conventions.
  • Describe your OU hierarchy, DNS configuration, network numbering conventions, and DHCP configuration.
  • List main functions of your GPOs and the process of organization.
  • Take note of the locations of AD’s Flexible Single Master Operation Roles (FSMO) roles.
  • Identify the organization’s policy when adding new user accounts or when revoking user accounts.
  • Describe the organizations’ policy for user restrictions.
  • AD design should be created for references

Control Your Administration

local admins, privileged users, domain admins, etc. These accounts are often used by sysadmins to manage and deploy IT systems. So make sure only legitimate people have access to the AD and only on the appropriate OUs. Many security teams have real-time alerts setup to report on any changes/additions to these groups since they should happen very infrequently.

ADDS Services Considerations.

  1. The server should be protected with AV & Backup Agent. AV should be configured with right exception & latest AV engine.
  2. Use Separate Administrative Accounts.
  3. Restrict Elevated Built-In Groups
  4. Disable Guest and Rename Administrator
  5. Limit Access to the Administrator Account
  6. Enforce Strong Password Rules
  7. Protect the Service Account’s Password
  8. Minimize Unnecessary Services and Open Ports.
  9. Make the DC Time Source Secure.
  10. Audit Important Events
  11. Monitor AD for Signs of Compromise.
  12. Login Restriction for the END users.
  13. FSMO roles should be distributed on different servers.
  14. User & Group creation should be documented & with approval.
  15. Record of delegated users access.

Group Policies.

  1. Default Group Policy should be enabled.
  2. Domain controller GPO should be deployed.
  3. Test GPO before deploy.
  4. GPO should be documented.

Daily operation.

  1. Check Replication & service health.
  2. Daily back up of Domain controller server.
  3. Daily back up of Services Like, DHCP DNS & CA.
  4. Documented the any Service Change on AD.
  5. Task Scheduler for health checkup script.

Additional Tool:

  1. Deploy ATA for behavior analysis of Active directory if you have EMS Licenses
  2. Deploy Azure AD health Agent.
  3. SCOM monitoring.
  4. 3rd Party Solutions for Monitoring

AD Test Environment

  1. Create test bed for current AD environment.
  2. Any configuration should perform in the Test environment.

How to access udemy courses for free

We can visit Udemy Coupon  http://udemycoupon.discountsglobal.com/ this udemy coupon website shares premium udemy courses for free on daily basis and is updated daily.

You can visit their facebook page to get udemy premium courses 100% free but keep in mind that the offers are for limited time only Udemy Promotions | Facebook

Join facebook groups, in this group udemy instructors shares their courses for 100% off

How to access Pluralsight Courses For Free.

Below are the steps to get 3 months free Subscription on Pluralsight


  1. Go to signup.live.com.  and create a new Microsoft Account. Skip this step if you already have one.
  2. Go to my.visualstudio.com and sign-in with your Microsoft account.
  3. This will open the Visual Studio Dev Essentials page. Here choose Pluralsight among the benefits and click Activate.
  4. You’ll be taken to the Pluralsight website to activate and redeem your 3-month subscription.

Happy Learning !!!


Enable Strict Replication Consistency

SRC where this is not enabled there can be a risk that lingering objects could be replicated to a domain controller. This can occur  when a domain controller in your Active Directory environment is disconnected from the replication topology for an extended period of time, this can cause problems when these lingering objects on the source domain controller are updated and these updates are sent by replication to the destination domain controllers.


You need to run below cmds with Enterprise Admin credentials.

repadmin.exe /regkey <dcname> +strict

If you want to make certain this is configured on all DCs in the forest you can pass a wildcard to repadmin.exe like this,

repadmin.exe /regkey * +strict

Warning: Before you implement this change forest-wide it is important to understand that all replication between the source DC and the destination DC will stop for any partition that has a lingering object in it. Replication will only be restored once the lingering object is removed. This could cause forest-wide authentication issues until replication is restored.

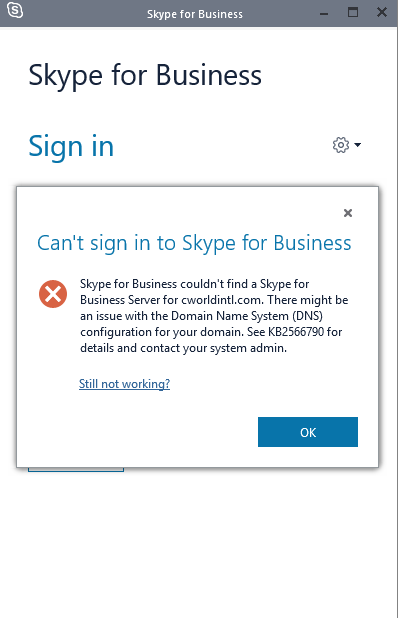
Skype for business client login issue. (SFB Login Issue)

1


You might have experienced above issue while working on SFB /Lync Client.

Skype for Business, Minimum Client Versions Required

Client Minimum version
Windows Lync 2010 client 4.0.7577.4521
Windows Skype for Business 2015 client 15.0.4893.1000
Windows Skype for Business 2016 client 16.0.4483.1000
Windows Skype for Business 2016 (Office 365 version) 16.0.6965.2117
Lync for Mac 2011 client 14.4.1 (160608)

Below are the steps to troubleshoot this.

  1. User Manual SIP: Use sipdir.online.lync.com:443 in both internal server and external server fields.
  2. Delete the Cache:
    • Lync 2010: %UserProfile%\AppData\Local\Microsoft\Communicator\
    • Lync 2013: %UserProfile%\AppData\Local\Microsoft\Office\15.0\Lync
    • Skype for Business: %UserProfile%\AppData\Local\Microsoft\Office\16.0\Lync
  3. Disable Antivirus.
  4. Delete Credentials from Credential Manager
  5. Restart the computer.
  6. Restart the SFB client.