Outlook disconnected, 2010/2016 Co-Existence issues with RPC

We installed  Exchange 2016 for Co-Existence with Exchange 2010.  Configured the Exchange 2016 Virtual directories, We were testing the Outlook anywhere and found that the internal Exchange 2010 users are unable to connect to Exchange while new created Exchange 2016 users could connect fine with there Outlook clients.

We were getting outlook is disconnected. But OWA and Active sync was working fine.

  • We have checked outlook anywhere configuration which seems to be fine.
  •  Checked the name from the internal access point for Outlook.
  1. Get-OutlookAnywhere -Identity “exch2016-01\Rpc (Default Web site)” | select InternalHostname
  • Checked the name from the CAS Array on your Exchange 2010 with following Cmd:
  1. Get-ClientAccessArray | Select Fqdn
  • Checked RpcClientAccessServer is set on the Exchange 2010 Mailbox Databases
  1. Get-MailboxDatabase | Select Name, RPCClientAccessServer


RPC Client Access Arra/Server and the internal Outlook Anywhere names were the same, that caused a routing loop once we switched over the default namespace to Exchange 2016.

So we fixed this name issue with below cmd.

Set-MailboxDatabase –Identity “<Database Name>” –RPCClientAccessServer “exch2010-01.contoso.local”

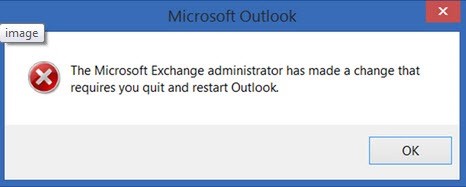
in relation to the end-user.  Changing this setting results in end-users getting pop-ups in Outlook stating that an Exchange Administration has changed settings and that Outlook must be closed in re-opened.
cq


2010/2013/2016 Coexistence – 421 4.4.2 Connection dropped due to SocketError EMAILS Stuck in QUEUE

One of our engineers was facing the issue while setting up coexistence between 2010 to 2016.

all the E2010 mail flow working fine internally and externally

We moved test mailboxes to E2016 & send emails from E2010 to E2016.

E2016 mailboxes were not able to receive the email, we checked the email trace, email queue and found “421 4.4.2 Connection dropped due to SocketError” when an E2010 mailbox tries to send to an E2016 mailbox

To fix this issue we made the below changes


  • Open Regedit (Start | Run | Regedit)
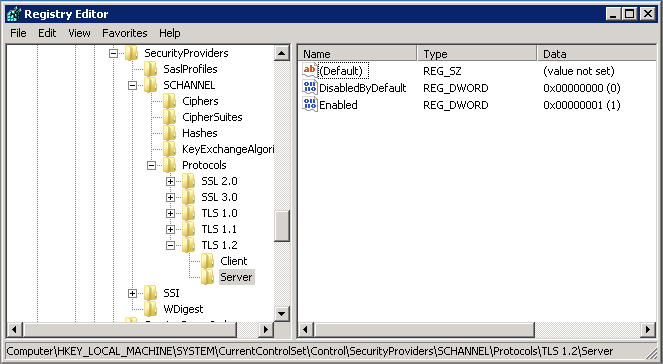
  • Navigate to the registry key: HKEY_LOCAL_MACHINE\SYSTEM\CurrentControlSet\Control\SecurityProviders\SCHANNEL\Protocols
  • Here you will need to create a key for each of the cryptographic protocols. Create keys named TLS 1.0 and TLS 1.1
  • Within each protocol key, create two subkeys. One named Client, the other named Server
  • Within each of the Client and Server keys, create a DWORD with the name Enabled. A value of 1 enables the protocol where a value of 0 disables it.
  • Within each of the Client and Server keys, create another DWORD with the name DisabledByDefault. A value of 0 enables the protocol (i.e. not disabled by default).

5

No reboot required.


Configure Exchange Online Advanced Threat Protection Policies (Office 365 ATP)

There are two types of policies which can be configured using ATP.

Safe Attachments: This policy lets administrators configure policies to block malicious attachments that users receive via email. Administrators will also be able to redirect the message to a designated mailbox so that checks can be made to ensure that the attachment is safe.

Safe Links: This policy lets administrators configure policies to check and block malicious website links or URLs contained in an email that users receive from an external party. When a user clicks on the link in an email, it will check against a list of known malicious links to protect the users from going to a malicious website or a link.


Exchange Online Advanced Threat Protection Licensing Requirements

ATP licenses cost USD 2.00 Per User Per Month and can be added to the following Office 365 Licensing SKU’s:

  • Exchange Online Plan 1
  • Exchange Online Plan 2
  • Exchange Online Kiosk
  • Office 365 Business Essentials
  • Office 365 Business Premium
  • Office 365 Enterprise E1, E2, E3
  • Office 365 Enterprise K1 & K2
  • Office 365 Education

ATP is included with the Office 365 Enterprise E5 Plan.

Configure Safe Attachments in Advanced Threat Protection

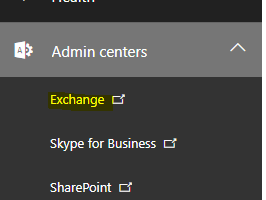
To configure “Safe Attachments”, the administrator needs to navigate to the “Exchange Admin Center” within the Office 365 portal.

1

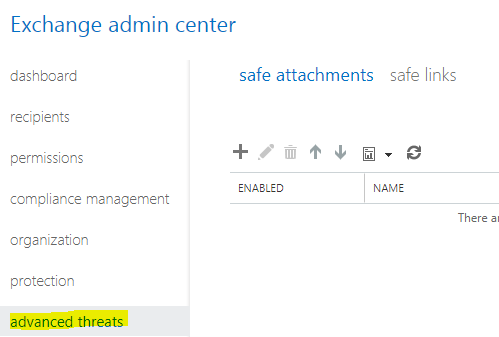
Once in the “Exchange Admin Center”, select “Advanced Threats”  This will open the configuration settings for “Safe Attachments” & “Safe Links”.


2


create a “New Safe Attachment Policy”, under “Safe Attachments” click “+”.

3

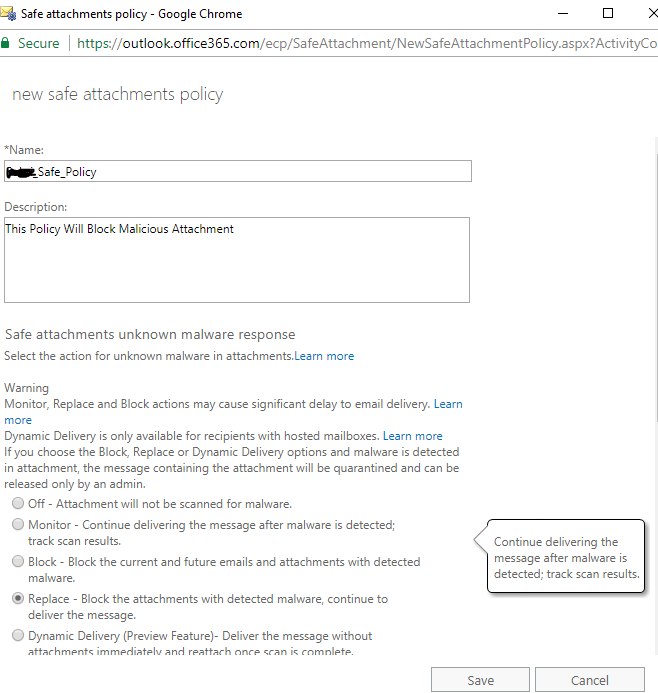
In the above “Safe Attachment Policy Configuration Window”, give the policy a name, a description and select the actions for the unknown malware in attachments. These actions are self-explanatory.

To block the attachments, select “Replace” which will block the attachment found as malware but will continue to deliver the email message without the attachment to the recipient.

Options can be specified to redirect the blocked attachment to a designated mailbox under “Redirect Attachment on Detection” and checking “Enable Redirect” and specifying an email address under “Send the attachment to the following Email Address” 

Scroll down the “Safe Attachment Policy Configuration Window” to bring up the “Applied to” section to specify if the rule needs to be applied to a specific recipient, recipient domain or to a group where a recipient is a member.

Select “Recipient Domain” under the drop down menu as this policy needs to be applied to everyone in the domain and click “Save” to create the new Safe Attachment Policy

Safe Links in ATP.

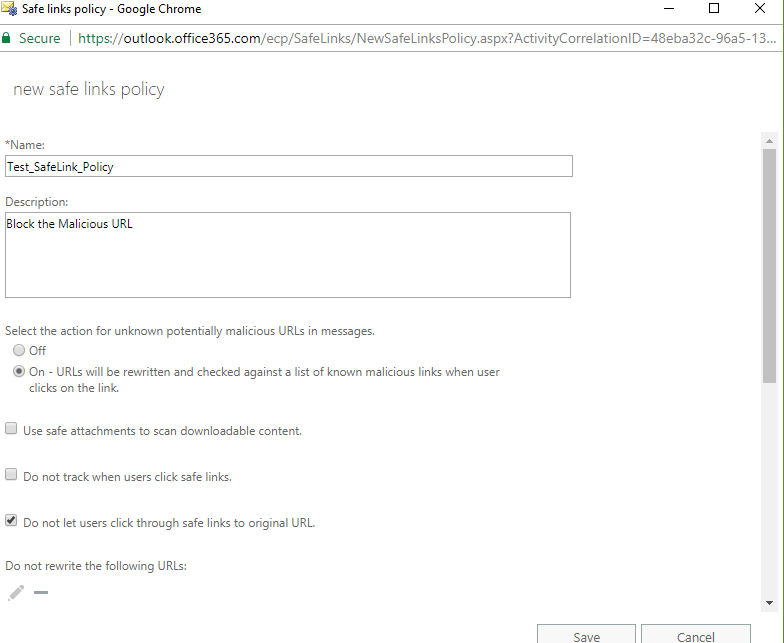
Create a “New Safe Links Policy”, under “Advanced Threats” select “Safe Links” click “+”. This will open up the “Safe Links Policy Configuration Window”.

4

Enable IMAP & POP3 on Exchange 2016.

By default, IMAP4 client connectivity isn’t enabled in Exchange. To enable IMAP4 client connectivity, you need to perform the following steps:

  1. We can check the status of your POP and IMAP services in the Services.msc console or by running Get-Service in PowerShell.
  • GetService ComputerName EX2016SRV1 Name MSExchangePOP*
  • GetPopSettings Server EX2016SRV1 | Select LoginType
  • GetService ComputerName EX2016SRV1 Name MSExchangeImap*
  • Get-imapSettings Server EX2016SRV1 | Select LoginType

Exchange 2013 or later the frontend and backend services both need to be running

2.    Set IMAP and POP services to automatic and start it

  • Start-service msExchangeIMAP4
  • Start-service msExchangeIMAP4BE

3.  Configure the IMAP4 services to start automatically:

  • Set-Service MSExchangeIMAP4 -StartupType Automatic; Set-Service MSExchangeIMAP4BE -StartupType Automatic


4. Configure the IMAP4 settings for external clients

To be Run on all CAS Servers

  • Set-POPSettings -ExternalConnectionSetting {mail.domain.com:995:SSL}
  • Set-ImapSettings -ExternalConnectionSetting {mail.domain.com:993:SSL}

5. Configure Certificate.

  • Enable-ExchangeCertificate -Thumbprint XXXXXXXXXX -Services POP,IMAP
  • Restart the Imap and Pop frontend and backend services.

6. For Wildcard certificate

  • Set-POPSettings -X509CertificateName mail.domain.com
  • Set-IMAPSettings -X509CertificateName mail.domain.com


7. Publish IMAP, POP & SMTP on OWA.

  • Get-ReceiveConnector “*\client Frontend*” | Set-ReceiveConnector -AdvertiseClientSettings $true -Fqdn mail.sfda.gov.sa
  • Set-ReceiveConnector “Client EXCHANGE” -AdvertiseClientSettings $true
  • Set-ReceiveConnector “Default EXCHANGE” -AdvertiseClientSettings $trueb


8. Default Logs Path for IMAP & POP3

  •  C:Program FilesMicrosoftExchange ServerV15LoggingImap4
  • C:Program FilesMicrosoftExchange ServerV15LoggingPOP3

9. Note:  “Don’t assign a wildcard certificate to the POP3 service”https://technet.microsoft.com/en-us/library/dd351257(v=exchg.160).aspx

Import and Export Receive Connector Exchange 2013/2016

How to Configure Exchange Server 2016 SMTP Relay while upgrading your email services.

In most organizations, there are several devices or applications that need to use an SMTP service to send email messages. An Exchange can provide that service for you, however, the configuration required on the server depends on the SMTP relay requirements of your scenario.


In my scenario, i am upgrading our client’s exchange server 2013 to exchange 2016. Now today we are moving application relay workload to new exchange 2016 server.


Few things you need to follow.

  1. Export all details of the current connector.
  2. Share the IP details with the responsible team for confirmation.
  3. Once you get the confirmation create new connector on new exchange server with below followings steps.

1:-Export Current Connector Information:-

You can use below cmds on EMS.

$list=(Get-ReceiveConnector “servername\external Relay”).RemoteIPRanges > c:\relayIPs.txt

Get-ReceiveConnector “servername\nameofconnector”| select -ExpandProperty remoteipranges|export-csv c:\filename.csv

Now in given path you will see a csv or txt file as per you cmds selection.

2:- Verify the configuration.

You should check the existing configuration of the connector. I suggest you ,  To document the configuration for reference.

Get-ReceiveConnector “CPLEXCH03\GC APP-FFRAPP-2013” | fl > c:\relayIPs.txt

3:- Create New Connector on Exchange 2016 

New-ReceiveConnector -Name “AppRelay” -Server servername -Usage custom -Bindings 0.0.0.0:25 -RemoteIPRanges 10.10.12.13 -MaxMessageSize 30MB -TransportRole frontendtransport

4:- How to Add Remote IP Addresses to new  Receive Connectors (You can use same cmds to add on IPs on existing connector)
$RecvConn = Get-ReceiveConnector “Connectorname”

Place IP address in text file  and save in c:printer.txt

Get-Content .\printer.txt | foreach {$RecvConn.RemoteIPRanges += “$_”}

Set-ReceiveConnector “AppRelay” -RemoteIPRanges $RecvConn.RemoteIPRanges

5:- Add Permission on connector

Get-ReceiveConnector “apprealy” | Add-ADPermission -User “NT AUTHORITY\ANONYMOUS LOGON” -ExtendedRights “Ms-Exch-SMTP-Accept-Any-Recipient”

Set-ReceiveConnector “servername\apprealy” -PermissionGroups AnonymousUsers


Method 2. 

You can use below scripts to copy the receive connector on multiple servers. 

Copy a receive connector from one Exchange Server to multiple Exchange Servers

Clone Exchange 2016/2013 SMTP Receive connectors

Change Exchange Server 2013/2016 Mail Queue Database Location

1.     By default the Exchange mail queue is located: %ExchangeInstallPath%TransportRoles\data\Queue

2.     To change the location of the database we need to go to the configuration file located on:   %ExchangeInstallPath%Bin\EdgeTransport.exe.config

3.     C:\Program Files\Microsoft\Exchange Server\V15\Bin directory.

1

4.     Edit the file EdgeTransport.exe.config & change the Path

1

5.     When completed restart the transport service:

Restart-service “Microsoft Exchange Transport”

6.     You can edit the “EdgeTransport.Exe.Config” file in the Bin directory to change the queue location, but it doesn’t move the existing queue and the Transport service has to be restarted manually.


  • 2nd Method

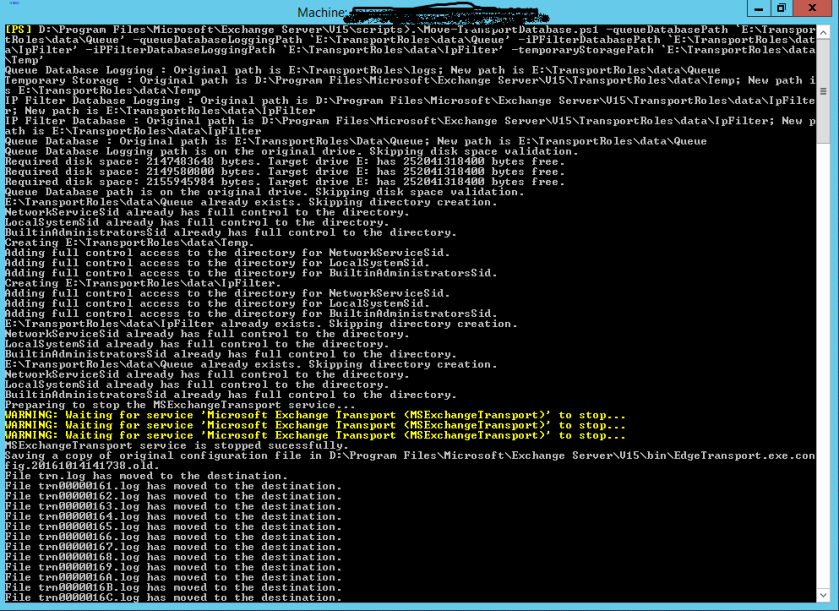
1.     Microsoft has created a scripts called Move-TransportDatabase.ps1 (located in the $ExScripts directory) which changes the location, moves the Queue Database and restarts the Transport service automatically. The Move-TransportDatabase.ps1 script takes the following parameters

2.     Run Exchange power shell with elevated rights.

3.     Execute: cd $exscripts

4.     .\Move-TransportDatabase.ps1 -queueDatabasePath ‘E:\TransportRoles\data\Queue’ -queueDatabaseLoggingPath ‘E:\TransportRoles\data\Queue’ -iPFilterDatabasePath ‘E:\TransportRoles\data\IpFilter’ -iPFilterDatabaseLoggingPath ‘E:\TransportRoles\data\IpFilter’ -temporaryStoragePath ‘E:\TransportRoles\data\Temp’

1

1

Result